Matomo Tag manager
About
With the help of CookieHub, you can easily configure your Matomo Tag Manager tags to be compliant with GDPR, CCPA, and other regulations related to user consent. Below are step-by-step instructions on how to do that.
Step 1: Implementing CookieHub
It’s not necessary to implement CookieHub through a Matomo Tag; Matomo works with CookieHub regardless of how CookieHub is implemented. If you have already implemented CookieHub or choose to use another implementation method, you can skip this step.
- Go to your Matomo portal for your domain and navigate to the Tag Manager section.

- In the Tags section, create a new tag.

- Scroll down and select the Custom HTML type.

- Give the tag a name, such as CookieHub Implementation.
- Paste the following script into the Configure what this tag should do field, replacing XXXXXXXX with your Domain code.
<!-- CookieHub-->
    <script>var script = document.createElement('script');
    script.src = "https://cdn.cookiehub.eu/c2/XXXXXX.js";
    script.onload = function() {
        var cpm = {};
        window.cookiehub.load(cpm);
    };
    document.head.appendChild(script);
    </script>
<!-- End CookieHub-->- For the Position value, select Head Start
- In the Configure when the tag should do this section, choose the Page View trigger and set it to Execute when any of these triggers are triggered
- Your tag should look similar to this:

- Click the CREATE NEW TAG button.
- Your CookieHub implementation tag has now been created. Once the changes have been published in Matomo, your CookieHub banner will appear.
Step 2: Configure Matomo Tags to Honor User Cookie Consent
CookieHub publishes events when cookie consent is given for each category or when the cookie consent has already been given on a previous visit and CookieHub is loaded again. To prevent Matomo tags from executing before the required cookie consent has been given, a custom Matomo trigger must be created. This trigger will be used by Matomo tags to determine when they can be executed. Let’s create Matomo triggers for the cookiehub_analytics and cookiehub_marketing events.
- Go to your Matomo portal for your domain and navigate to the Tag Manager section.

- In the Triggers section, create a new trigger.

- Scroll down and select the Custom Event type.

- Give the event a name, such as CookieHub Analytics.
- In the Configure this trigger section, set the Event Name value to cookiehub_analytics.
- Your event should look similar to this:

- Click the CREATE NEW TRIGGER button.
- Repeat steps 2-7 for the marketing category using the event name cookiehub_marketing.
- Now the Analytics and Marketing triggers are ready to be used by tags to prevent them from loading without the correct cookie consent.
- Update your tracking tags that require cookie consent to only use the new custom triggers.

Other tracking scripts mark up
This only applies when CookieHub is implemented through a Matomo Tag
If you’ve chosen to implement CookieHub with Matomo and have tracking scripts on your domain that aren’t loaded with Matomo, you can mark them with the Conditional Html Tag to prevent them from being executed before the required cookie consent has been given. This is necessary because the CookieHub autoblocker doesn’t work when implemented with Matomo. The reason is that Matomo is loaded asynchronously, which means that other scripts may finish loading before CookieHub is fully loaded through Matomo.
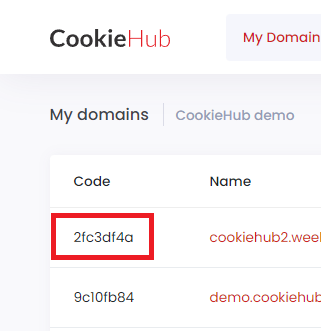
How Do I Find My Domain Code?
Your domain code is a unique identifier for your website on CookieHub. To find it, log in to your CookieHub account and navigate to the dashboard. The domain code can be found in the list of domains: